When setting up something like a new sensor for a project feature, it’s become typical for engineers to grab a development kit for their ease of setup and the speed at which developers can get up and running. The usual approach involves a quick breadboard job to connect the dev kit to the existing hardware, and then the engineer can go on their way writing software to use that sensor in their project. Issues that spring up during testing can often bring the engineer back to their newly written code but, as we learned recently, before even diving into the code, take a longer look at the datasheet first.
Playing With New Hardware
We were tasked with giving our existing hardware the ability to measure the angle of rotation between two mechanical parts. We were using the Melexis MLX90316 rotary position sensor which uses the magnetic field of nearby magnets to output a position from 0°- 360°. We had access to Melexis development kits with the sensor included, as well as the nRF52 dev kits, which we had been using to test new features, thus the path was clear to begin connecting the two up and beginning to test out some features.
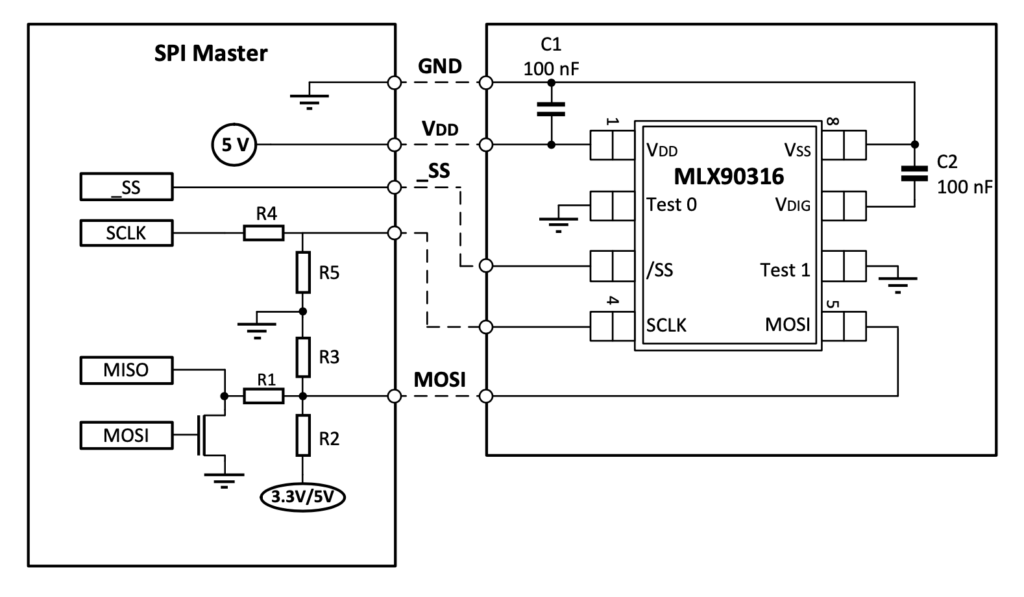
The Melexis comes in three different flavors and our existing daughter board in our system used the standard SPI-ish version shown in the image below. It uses a FET to allow for the data in/out lines to go to one pin of the sensor while still being driven by a SPI master on the other side. Following our existing board schematic and the MLX90316 datasheet we got the dev kits wired together just fine and also whipped up some SPI code and pin definitions for the nRF52 so that it could continuously query for the position from the Melexis. Our Melexis dev kit came with a neat little knob with a built-in magnet that we could twiddle in order to conduct tests, so we were ready.
Getting Played by New Hardware
We all held our breath in anticipation as we powered the system up, having started our debug logging, but nothing happened. None of our log statements with the encoder values were appearing, even though the rest of the functions were working as expected! Puzzled, we broke out the oscilloscope in order to check the SPI traffic. The CS and CLK signals both looked great, MOSI and MISO not so much. We could see the request for position leaving our dev kit, but the return on the MISO pin was completely garbled. Instead of seeing bits clocked out as they should be, we were seeing something that looked more like an RC signal similar to the green trace below. Brainstorming what could have been going on, our suspicions landed on the transistor that we were using to act as the FET, which we had in the real hardware circuit. Was it backwards? Did we have the legs correct? Was the transistor just bad? Maybe the encoder dev kit had an issue?
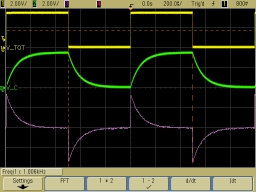
Scope trace from an RC circuit, our MISO signal looked similar to the green trace.
Those questions continued and eventually led back to the datasheet for the encoder chip and the evaluation board itself. It was only after we reviewed those datasheets in-depth for the second or third time that we came to the realization that this chip came in three flavors, and the one on our evaluation board happened to be the analog output flavor. Sure enough, as soon as somebody twiddled the magnetic knob over the Melexis, we saw our terrible-looking scope trace start moving up and down on the oscilloscope screen maintaining its terrible form.
After some more furious Googling, we found that it was possible to reprogram the firmware on the Melexis so that it could operate in the output mode which we were expecting. Unfortunately, to do so required that we have access to a specialized programmer which was in the neighborhood of $5000. At that point in the project, we knew that it was only a week’s wait until we had the real hardware in our hands Therefore development on the Melexis driver was sidelined until those new boards came in. When they did arrive, the code that had been examined, re-examined, and fixed en-route to finding out about our analog output worked perfectly once hooked up to the right hardware. Turns out all of that troubleshooting was worth it in the end!
Conclusion
The Melexis datasheet was our first stop in order to check out wiring diagrams for our shiny new chip so that a breadboard circuit could be created. That step is a common one shared by many developers working on most new pieces of hardware. However, our problem was that we stopped reading the datasheet after the wiring diagram. Like a lot of engineers, when the operation of the hardware went sideways we started breaking out all of the hardware and software tools we had in order to investigate, but a more thorough review of the hardware we had on our dev kit would have served us much better, and led to a quicker solution. More often than not, though, it turns out that the issue is in some of the basic assumptions made in the setup (like which output mode your sensor is in).
Next time you find yourself developing for a new sensor or peripheral, take the time to read the data sheet from cover to cover, and refer back to it in order to confirm that what you believe to be true, really is true. You never know how much time that could save in the long run.
Let’s Work Together
And if you have questions about an embedded project you’re working on, Dojo Five can help you with all aspects of your devops for embedded journey! We are always happy to hear about cool projects or interesting problems to solve, so don’t hesitate to reach out at hello@dojofive.com or schedule a call here.